A couple of things...

First off, I am loving the new Elle Decor.  Ashley Stark's home is one of my new favorites.
Check out more here.
Just know you will be seeing me attempt to make that light fixture shortly...

And speaking of new favorite spaces, have you seen (I'm sure you have because she is all over the blogosphere) Naomi Stein's pad?!?!! She blows me away with her talent and her fearlessness. Love her!
And she did us proud and knocked our socks off with her use of O'verlays on her RAST dressers...
seriously good!

Check out more of her incredible space over at Design Sponge or her blog Design Manifest.

And thanks to Nate Berkus for featuring our O'verlays in his Change It or Chuck It segment today!
Pretty freaking cool!


Painted Ikat Chevron Wall

 I finished my last painting project today!  I stenciled my entry in an ikat chevron stripe. (Yes, this used to have the big DeGournay mural.  As much as I liked it, I learned I am not that much of a yellow person.  Also I paint all the time, so I get tired of things quickly.)

 The rest of the room is gold and white squiggles.
 I did this by cutting a stencil and going row by row...
 The homemade stencil cut from tag board.  I measured the width of my wall and found a # that easily divided into it (about 2' in my case). I made that the width of the zig zag. I then sketched the zigzag to get a height I liked.  I drew a jagged top edge and cut it out with an Exacto.  Note the flat bottom edge...
 As I would go down, working top to bottom, the new row would make the ragged edge for the last.
There were a few white rows that still had to be finished, so I cut the bottom off the stencil once I finished all the rows and used for the last few edges...
I just worked across, laying the jagged edge over the flat edge and using a brush to add a jagged edge to the white rows...

and then I had lots of touch ups.
The one good thing about having a ragged edge is that I didn't worry to much about the paint bleeding.
Oh, and I finished one more project before Thanksgiving... my chairs.  I used the blanket I had in my son's room.  They didn't care for it too much, so I took it back.
 

I am now done for a bit with projects.  Time to focus on Christmas.  We got our tree yesterday, and decorated it last night.  The kids were so excited, that makes it so much more fun.

Now we plan on getting cozy and watching lots of Christmas specials here,
or couch jumping...

Daylight and Answers

I have some so-so daylight pictures. It is raining dogs here and is quite dark and gloomy, so the lighting is just OK...

 I have some answers for a lot of your questions too!
Someone had asked how I hung the curtains because you couldn't see a rod.

I used a basic cable system from IKEA.  I thought about painting this gold too.

If you don't want to use a rod this is a trick I learned over the years.  I use eye hooks screwed into the wall every 2" and simply attached the drapery hooks to each one. 
 The panels will be stationary (obviously).
 Next up is how did I hang the paper...
 I used good old commercial strength non-staining clear paste. Roman Formula 838 to be exact.
Also I find brushing the paste on (you can also use a roller) works better because you can apply it a bit heavier.
 Fold the top over on itself, and then do the same for the bottom (wet side to wet side) and let it "relax" for about 3 minutes. 
 When you hang, open the top half, match the seam to the previous strip and start smoothing down and out to the sides with a wide soft wallpaper brush.  When you get to switch plates or outlets take a pair of scissors and snip a criss cross over the area and then trim around...
 And if you over cut an area, just snip a patch to fill in. I did this along the top and around the heat register.  Unless you are looking for it you don't notice because of the texture.


For those of you in an apartment or not wanting anything permanent I would suggest double sided tape along the seams and edges and then use grosgrain ribbon at the top with brass push pins for a nice finished edge. Something along the lines of this, but not as elaborate (sorry this was the best I got for googling "grosgrain and tack banding on wall", but it does kick ass...)
Hope this helps!

 Come back in a few days, I am working on my last big project wall.
I made a stencil for some flame stichery zigzag pattern and hopefully will start some painting soon.  Today has been one of those days where nothing is going smoothly, so I might just wait.
    Have a Happy Thanksgiving!

Super Cheap DIY Metallic Gold Grasscloth

In honor of the end of spray paint season, I decided to go out big.
 6 1/2 cans and light headed big.
For my next trick I decided to make my own metallic gold grasscloth.  Why?
Because I really wanted some and didn't feel like spending over $100 a roll for it.
 Mine totaled out under $20 a roll...

sorry for nightitme pics, need to update in the morning

Remember my hell room? 
This is what it looked earlier in the day...


Grasscloth has saved it!
So here is how I made my own metallic weave..

1) Find remnants or excess on Ebay or wallpaper sale sites.  I found 4 new tan Waverly singles for the "Buy It Now" price of $49.99.
 ( I lost 2 auctions because I was trying to stay under $10 a roll, and both times they went for about $15. Stupid, cheap me.  When I saw this for $12.50 a roll I jumped quick.)
I also had 1 1/2 rolls of a similar weave in dark green from a previous project.


2) Make a sample...


This is a shot of the tan and the green painted.  They looked close enough, especially because I had a big break between where they would be going.

3) Spray away.  I used 2 sawhorses and cardboard along the bottoms for the rolls to rest on.  I did one roll Sunday when it was warm and it dried really fast.  Today was chilly so it took a bit longer.  Simple back and forth motion.  2 cans+ does a double roll.


4) Hang.


Grasscloth is also awesome for the 36" width factor. It covers faster and is rigid so it was very easy.  It went right over my paneling and covered the seams perfectly!
(I did get impatient at the end and cut myself twice while trimming due to the thickness, but I should have changed my blade.)

One tip I have is to paint any trim that is against the grasscloth BEFORE hanging.
The last thing you want to do is get paint on your paper, and this way the trim painting is easy...


I am almost done with this room!  I love how much cozier the space feels by adding gold and texture. It feels very "Thanksgivingish".
 Thomas just likes to ride the gold pig and wear a "big brain".


So final break down for the paper...
4 singles @ $12.50 each (Ebay)
1 1/2 singles -personal remnant
6 cans Rustoleum Bright Gold $3.21 (on sale Lowe's)
Total- $69.25


Lit

I have a DIY challenge for someone.  Make one of these...
I don't have room for one, but I think it could be very cool!
All you need is a cheap pendant kit from IKEA, fishing line and a bunch of inexpensive glassware.  They have martini glasses here, but imagine champagne flutes or colored glass!
Any takers?

Rhinestones and sequins on a Friday night

Me and the kids hit up the local A.C. Moore today and depleted their rhinestone and sequin department.  We have all been house bound and sick for what feels like forever, and I spent too much time on Pinterest making a Christmas board and seeing way too many cool ideas and shit to make.

When we got home I finally finished my Maskros hack. I lost the ping pong ball centers for some glitz.  One pack of coffee filters, 2 packs of mini cupcake liners and 160 large rhinestones later... 
More of this later when the room is done, which needs to be Thanksgiving because the tree is going up in it the following day and all my energy will be going into CHRISTMAS!

Shiny stuff rules!

Next the kids got their groove on making Christmas ornaments. This is actually round 2 in our house. I am kind of a Christmas nut, so I totally get excited when my kids want in.

Thomas got his tree thing on...
The big hit with the 4 year old was making Angry Bird ornaments.
Pom poms, felt and googly eyes. Done.


They then took them to the playroom where they stacked blocks and reenacted the video game.

P.S. Making anything with sequins, small beads or Elmer's glue WITH kids is not for the faint of heart.  I am far from OCD, but what a freaking mess. My little organized containers of pins, beads etc. is one big pigpile of crap.  Cheers to deep breaths, vaccuums and happy holiday memories. And hopefully swearing in my head and not outloud when I step on a bead tomorrow morning.

Mystery Fabric

UPDATE: mystery solved. It is a Brunschwig, "Chinese Leopard Toile" (thanks  ladies!)
I found the history of it over at Peak of Chic

Does any fabricphile recognize this pattern?
I picked up this drapery panel at my favorite thrift store  and I really love it. My favorite part if the blue and black "leopard" thing that is happening in the background. Problem is there was only one panel and I think this could look kickass in my bedroom with my pagoda headboard.

I am going to have to check into the shop frequently to see if another panel turns up, or scour Ebay.
I opened the side and the salvage has been trimmed off, so no info.


If anyone knows any info on it or who made it I would love them FOREVER, or if you have this and want to part ways let me know.

Today's pretty pick


A little dose of pretty from the super talented Molly Luetkemeyer.  I am completely adoring this restful pink/apricot/green color combo. 


I needed this after last nights mental unraveling.
Still have a kid home sick.
Good news though, my awesome niece is coming to babysit and set me free.
I have major catch up to do!

Far from pretty, more like the crazy ugly truth...

 Its been a long week and it is only Monday. Cheers to drinking and blogging time!

I have had a LONG previous week and it shows....
 Check the uniform.  I only wish you could see my eyebrows  up close.

So I made is through last week of one day of kids at school, Joe's tooth extraction- (round 3 was a success!)  He likes waiting rooms. Takes after me, its the only time I really get to enjoy a mag too...

 Any issues we were given with him have been counterbalanced with his super happy disposition.
Would you be this happy after surgery? He told me it was awesome (P.S. he was out cold for it).
So enter the weekend. 
Big bro is now sick. Sick Saturday, Sunday and MONDAY.  My kids have now been home for a solid week. I needed to do something, I was climbing walls.

What to do with lethargic children?

Take advantage of their couch potato state and rearrange the shit out of my house.  All I had to do was pick them up off one couch and put them on another. 

Listen, I was stuck in the house too long.  I was hating all my unfinished stuff.  I was hut happy.
So I did what any insane person would do.  Rearrange for the 105th time, slipcover and make pillows.  And drag an 8' long dining table through a 30" doorway because I am too impatient to wait 4 hours for my husband to get home.  So Project Hot mess got hotter...

 and bluer and fuschia-ier too.  Dining table is back where it started. Seats are going blue...
 Lets go back 2 months ago right after the last rearrangement....


Better yet lets do a montage of the past 20 months and see my madness with this space.  I truly hate it. It is too big and long,  & well I just can't get it right. And I also blame it on being constantly exposed to design and ADD.
1/2010

5/2011 trying to make chintz cool

2/2011

fall2010

summer 2010- liked this, should have kept it

and now the dining room, family room, living room looks like this currently...
(note the potato on the couch)

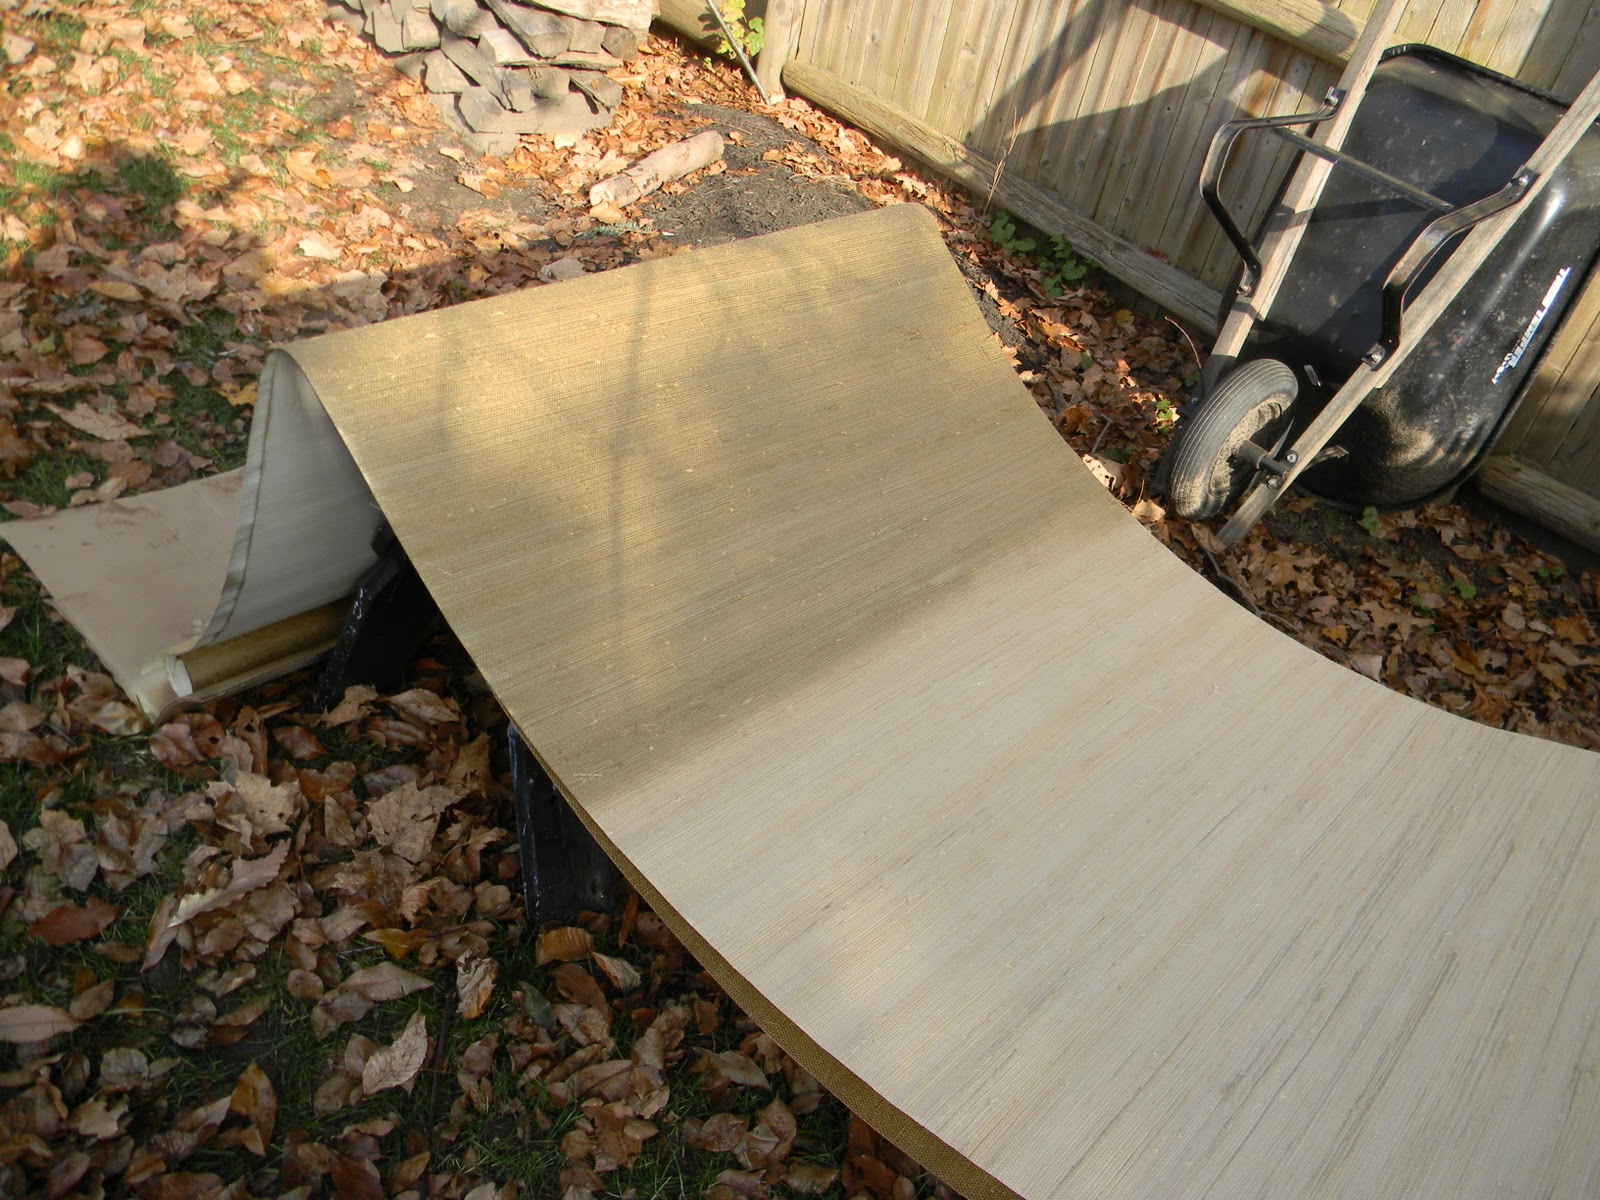
I have some of this to go on the walls, and I intend to spray it with a little razzle dazzle before hanging...
And instead of boring you with another montage, I will just show you what it used to look like before we bought it and I screwed with it too many times...
Starsky & Hutch.


 So. Yes. I have freaking huge issues.
And the cold bug better not spread to the little one, because I REALLY need a day out of this place.
And I really need to get a hobby, besides turning my space upside down.


LinkWithin

Related Posts with Thumbnails